
Lecturer’s Instructions for Working in Google Workspace
HOW A LECTURER CAN CREATE A GOOGLE CLASSROOM IN THE CORPORATE DOMAIN:
- Creating your own Classroom
- How to invite students to your own Classroom
- How to create an assignment in Classroom
- Checking and grading assignments
- Video instructions for working in Google Classroom
Creating your own Classroom
-
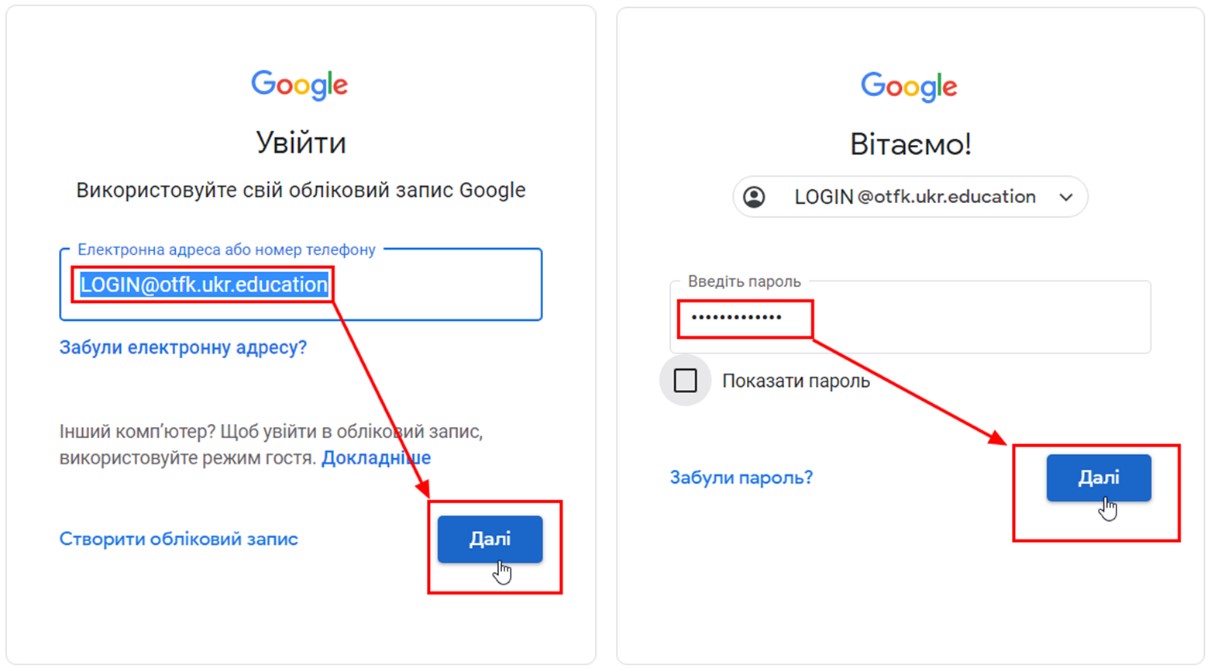
Go through the authorisation procedure (sign in to your corporate account).
-
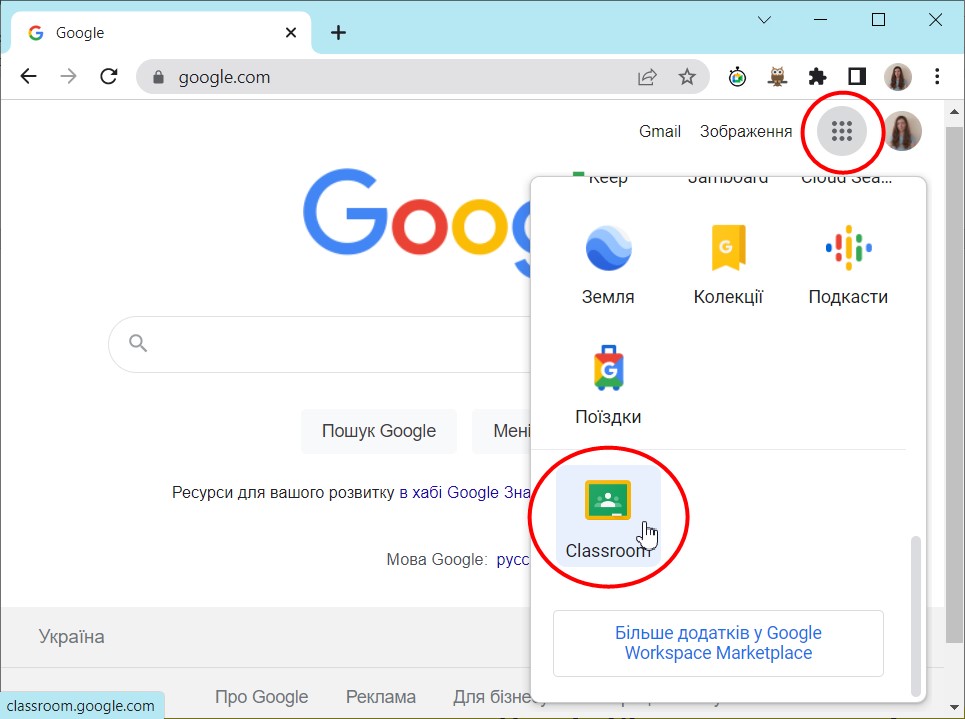
Open the Google apps in the upper right corner and find the Classroom app.
-
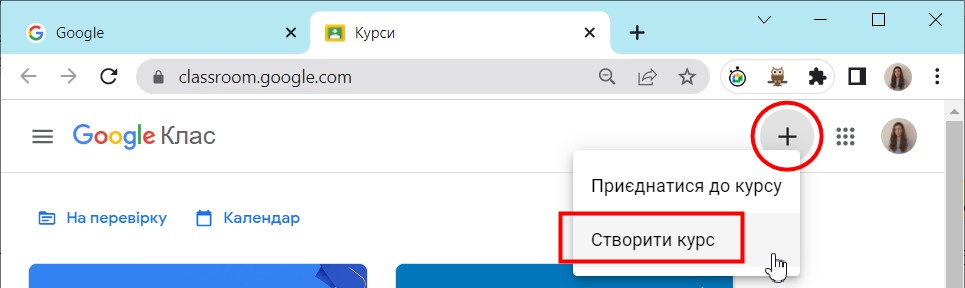
To create your own class, click the “+” in the upper right corner of the window and select “Create class”.
-
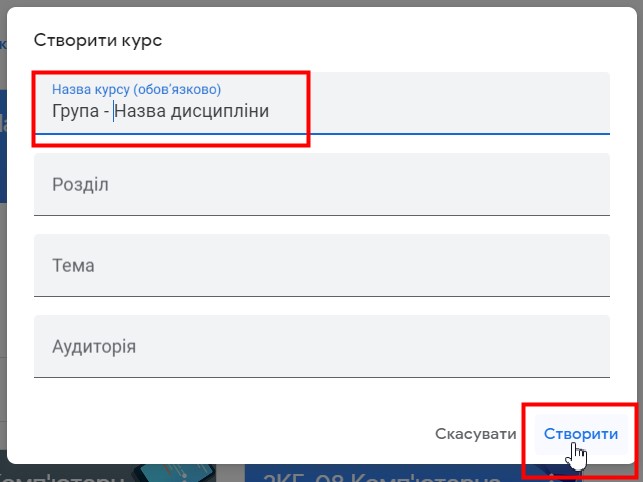
In the window that appears, enter the class name and click the Create button (each group must have a separate course! Courses can be duplicated, that is, you can create and fill one course with materials and then create a copy of it for another group).
-
A new browser tab will open with the course you have just created.
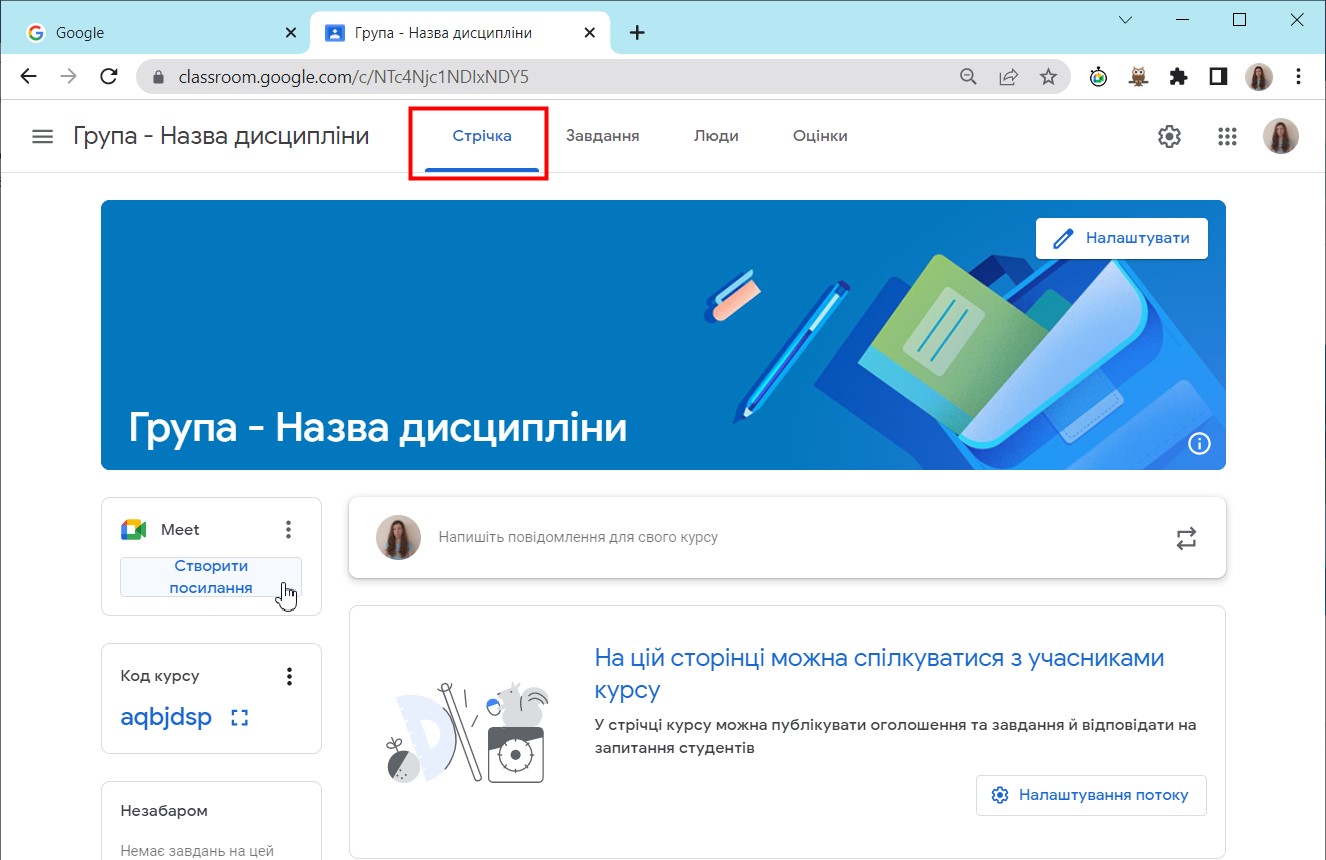
The first screen, “Stream”, is a news feed in which students see the important announcements you have posted. Students can also post public comments, as on social networks.
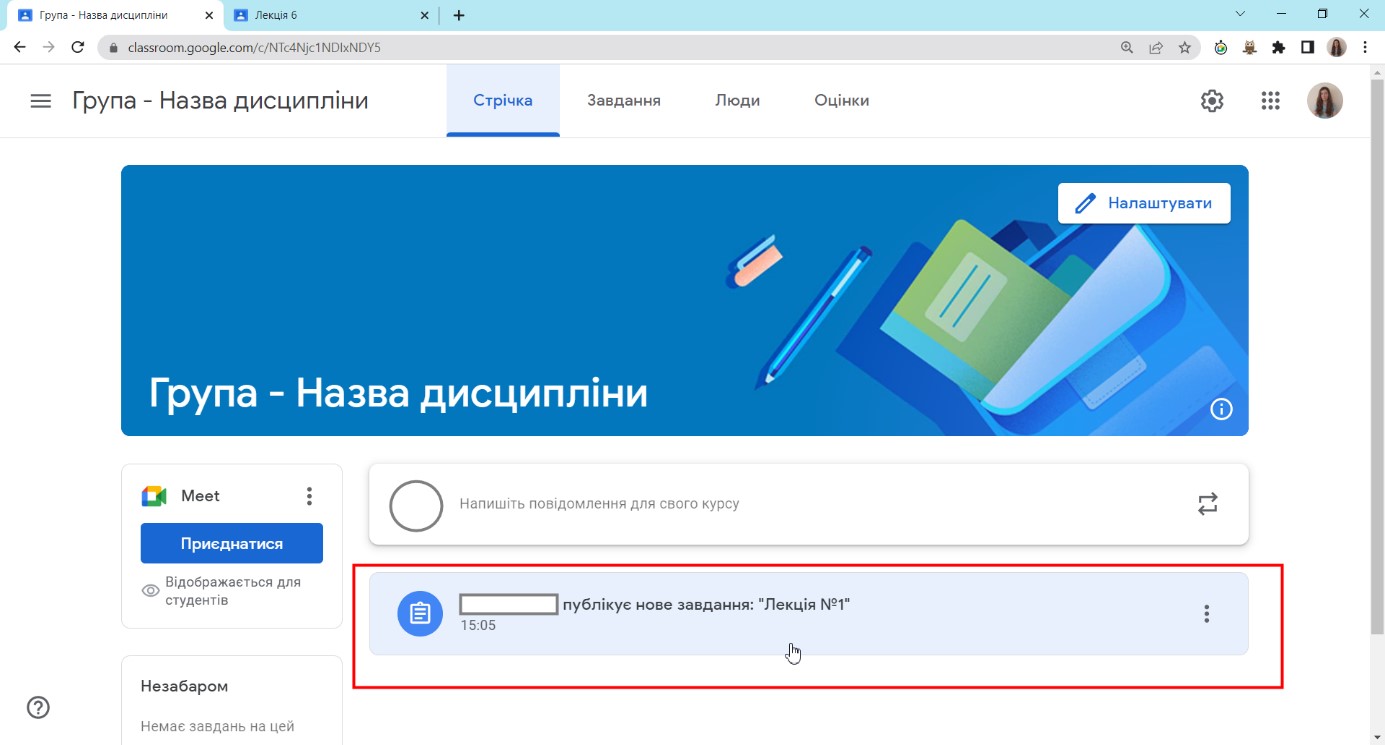
Posts appear automatically on the Stream tab when you publish an assignment.
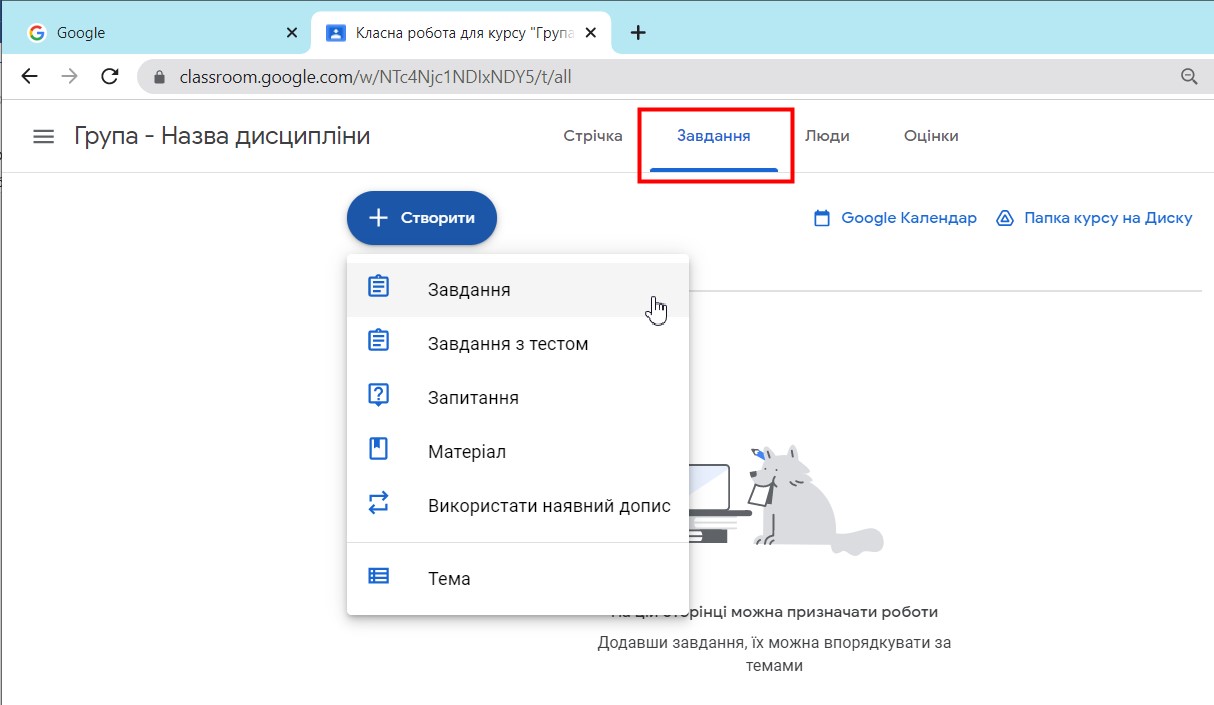
The second screen, “Classwork”, is the most important tab in Classroom, where the online curriculum is created and where tests are conducted and students’ work is checked.
How to invite students to your own Classroom
On the “People” tab you can invite students and view the teachers and all students of the course.
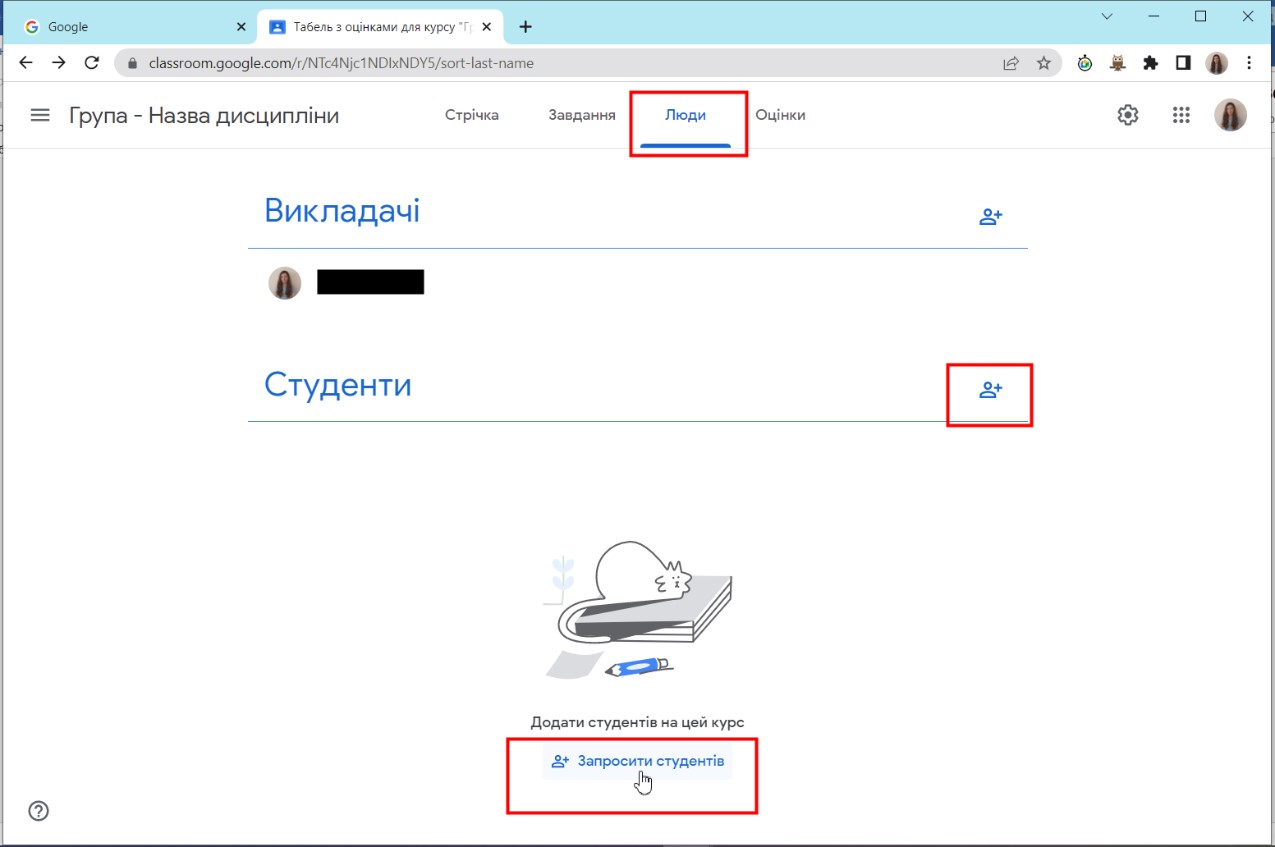
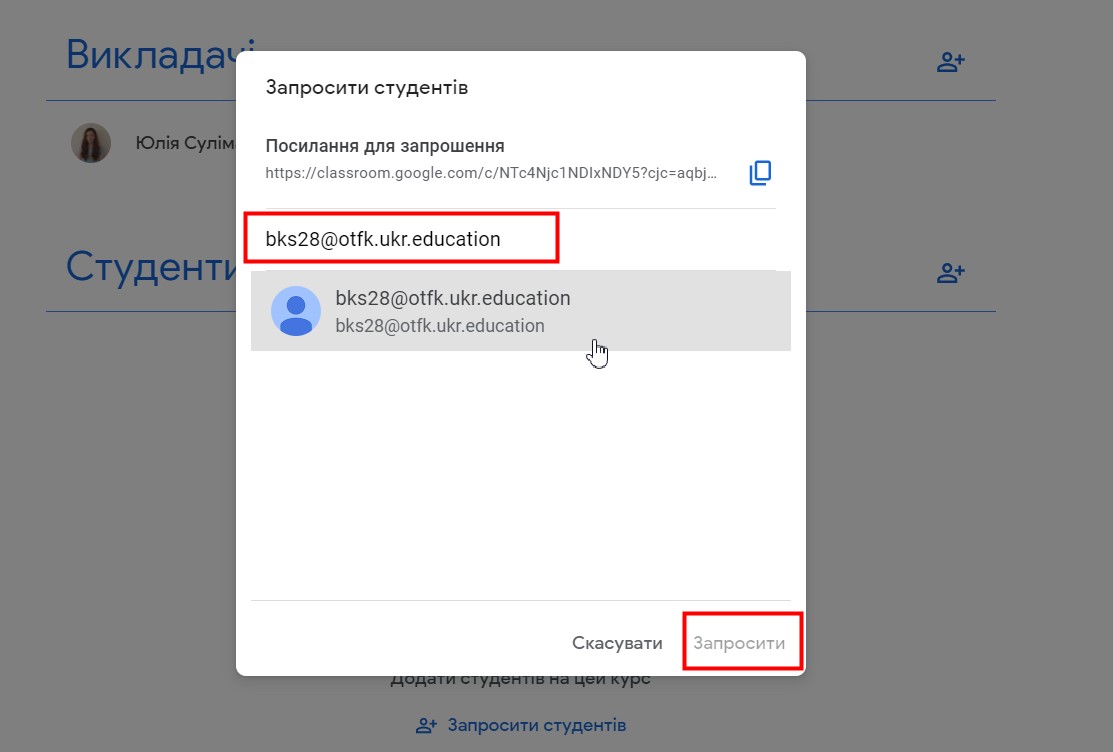
- Click the Invite students button. In the dialogue box that appears, enter the e-mail address of the study group, which consists of the group code written in Latin letters and the standard ending of corporate mailbox addresses – @otfk.ukr.education.
For example, to send invitation e-mails to your course to ALL students of group 2BKS-28, you need to enter the address bks28@otfk.ukr.education, select the address of the required group from the search results and click the Invite button.
Each student will receive an e-mail notification of the invitation to the course, and the student list will be filled with their surnames and first names.
Until a student joins the class, the label “Invited” will appear next to their surname.

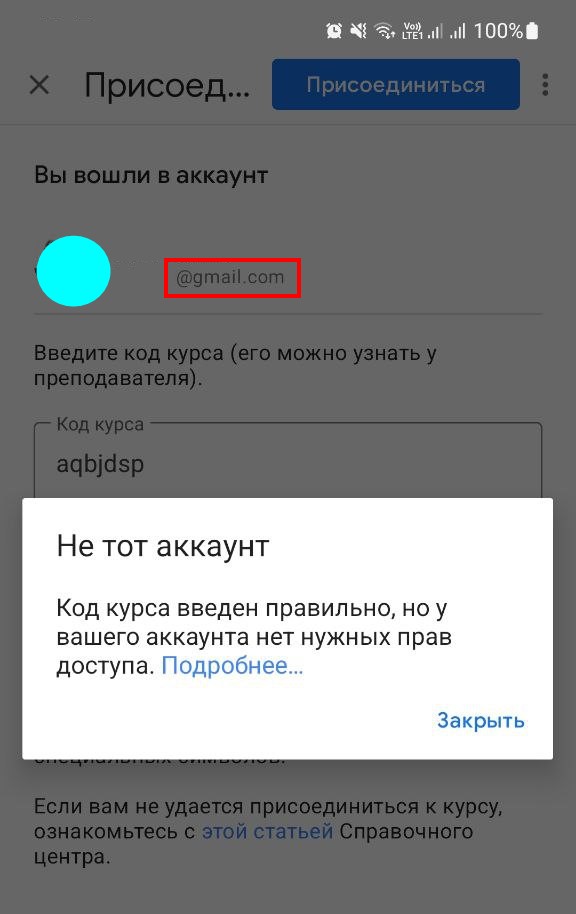
DO NOT USE CLASS CODES when working in Workspace, because students unsuccessfully try to join the class from a GMAIL account, forgetting to switch to the corporate account!!!
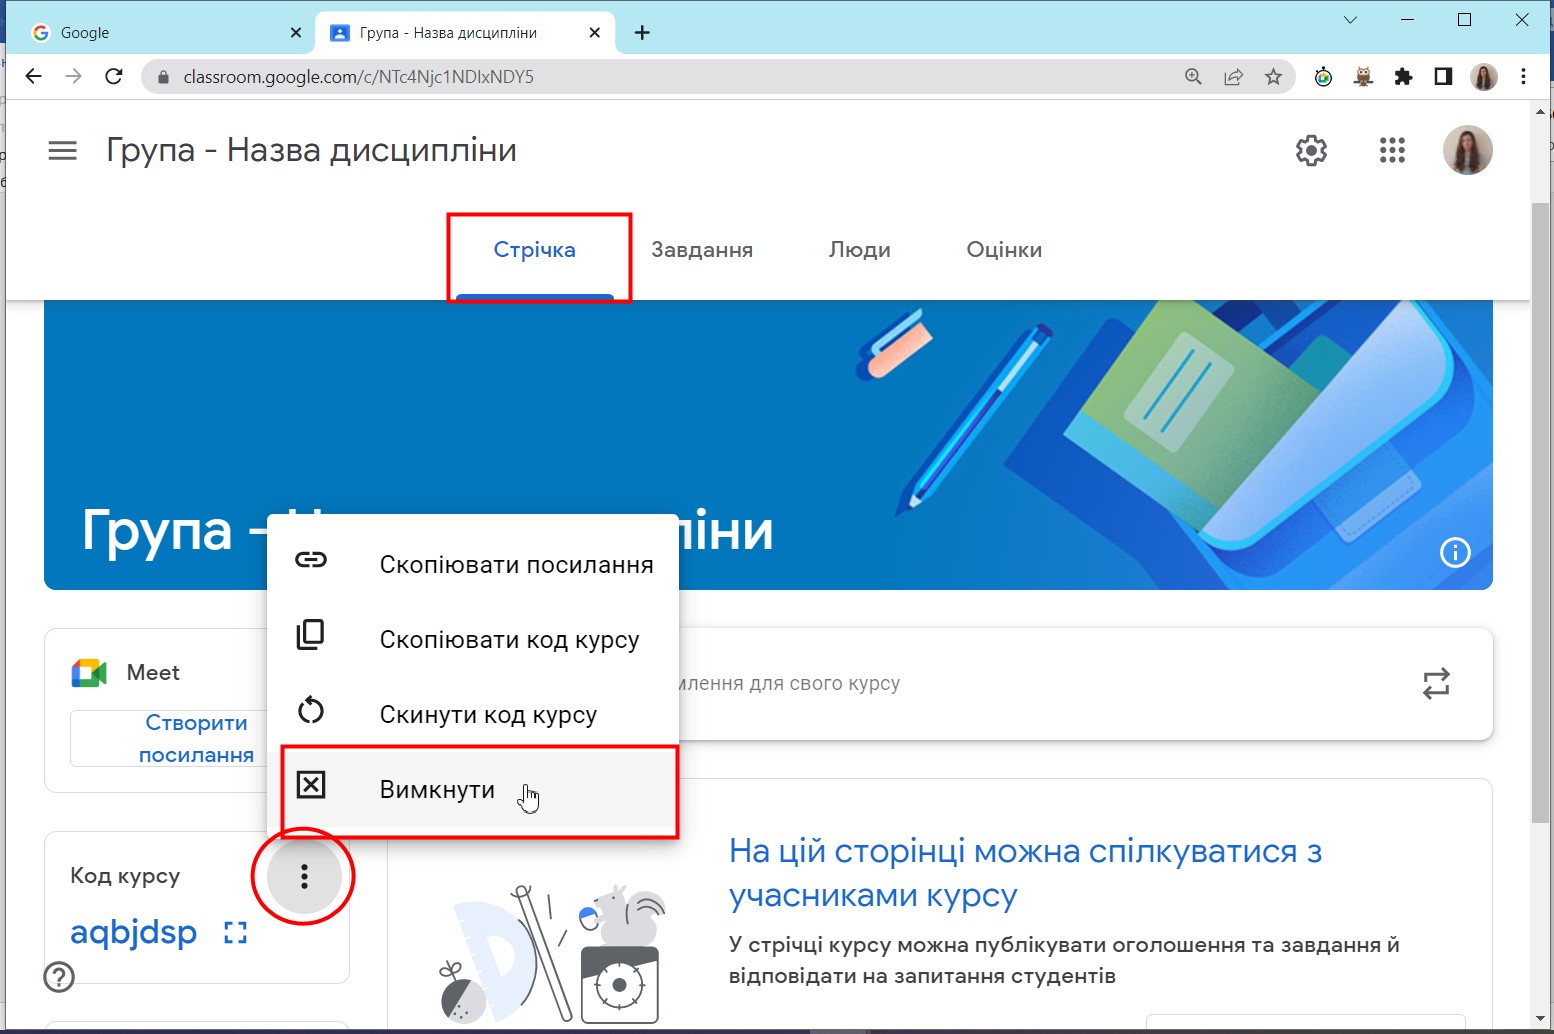
For correct operation, turn off the display of the class code straight away. Go to the tab Stream – Class code – three dots – Turn off.
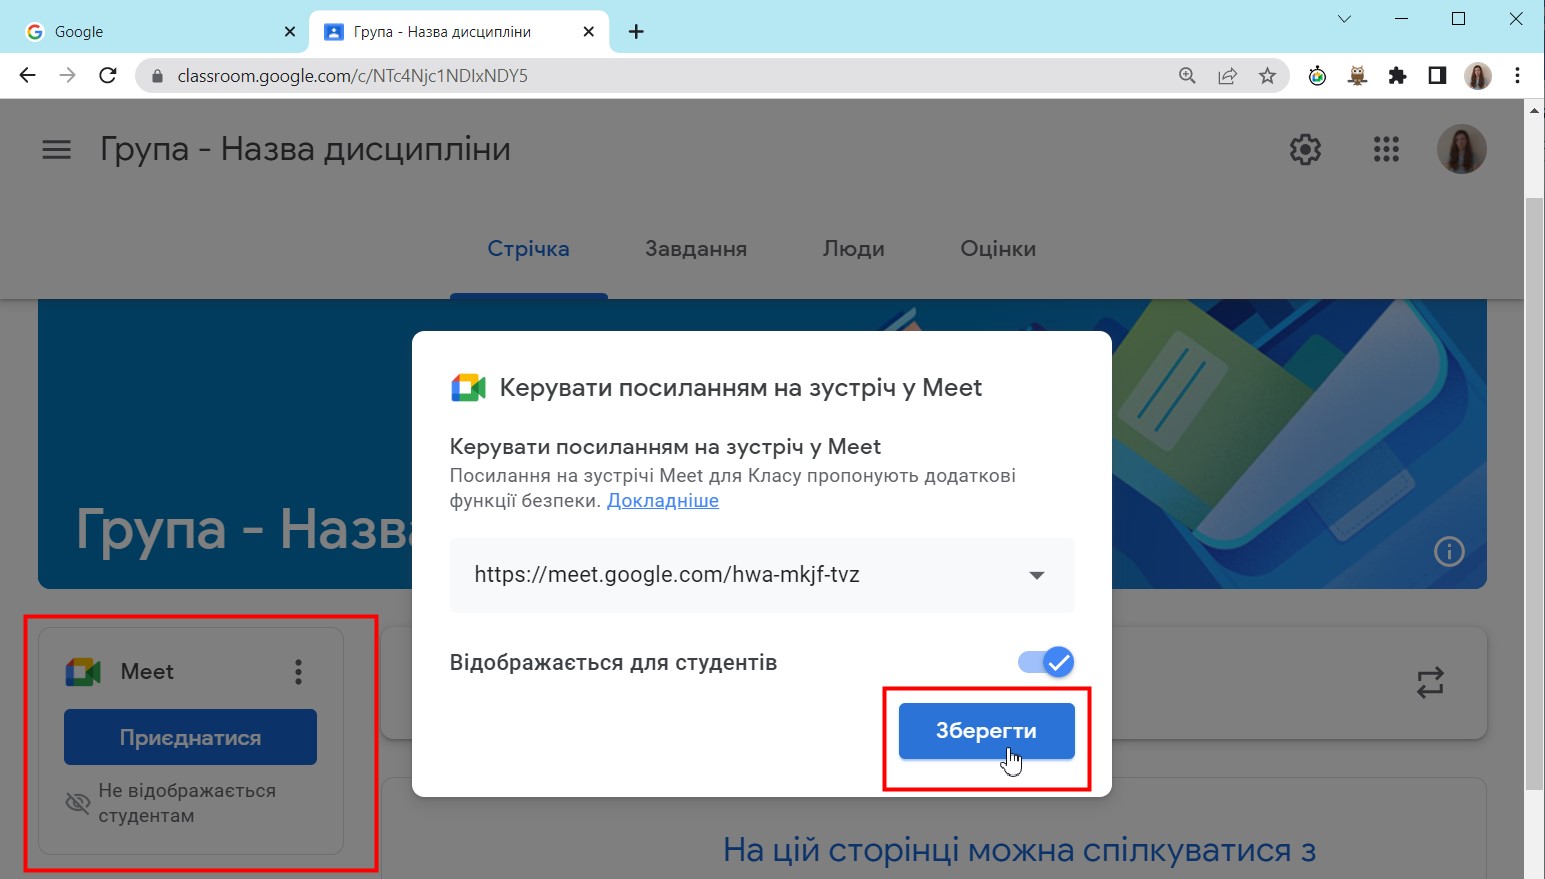
- To create a permanent link for video meetings, click the Meet “Generate link” button. Set up the display of the link for students by switching on the corresponding toggle and click the Save button.
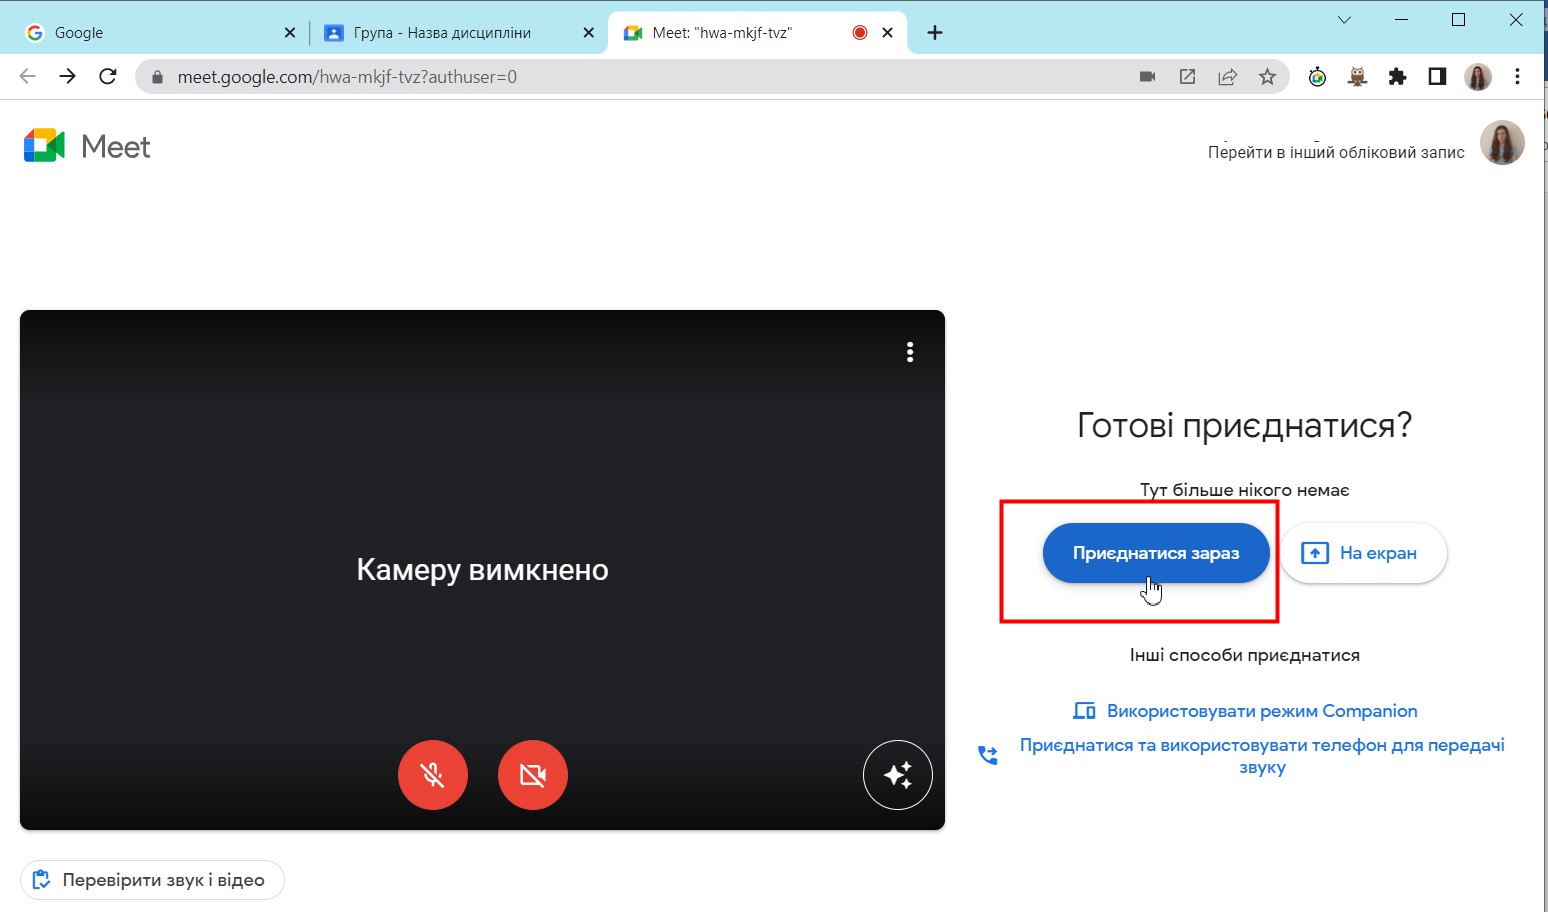
Google Meet is a service for holding video conferences (similar to Zoom). When you click the Join button, a new browser tab will open with the video conference settings. Turn the microphone/camera on or off and click the Join now button to start.
The Meet interface is minimalist and clear. At the bottom of the window there are buttons that let you turn the camera and microphone on or off (1, 2), raise your hand (3), start a presentation/share a window (4), go to the conference settings (5), end the conference (6), view the list of participants (7), open the chat (8), create a whiteboard (9) and manage the advanced meeting settings (10).
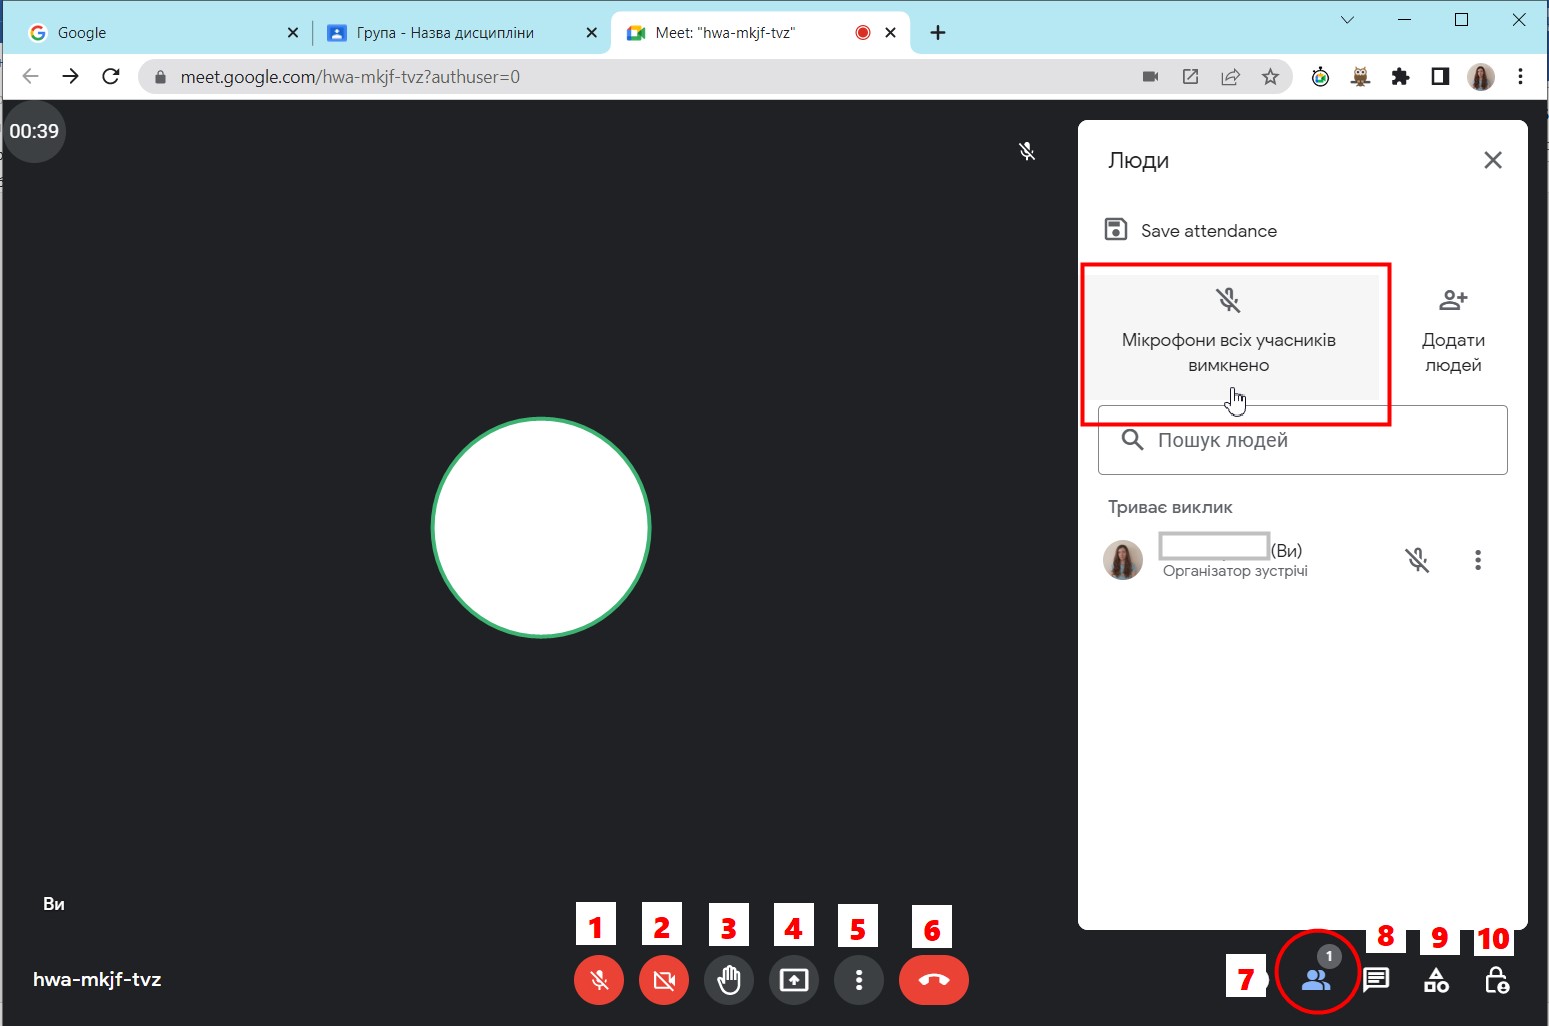
Please note that the microphones of ALL participants can be muted with the Participants – Mute all button.
All students who have been invited to the course will join the video meeting automatically.
How to create an assignment in Classroom
-
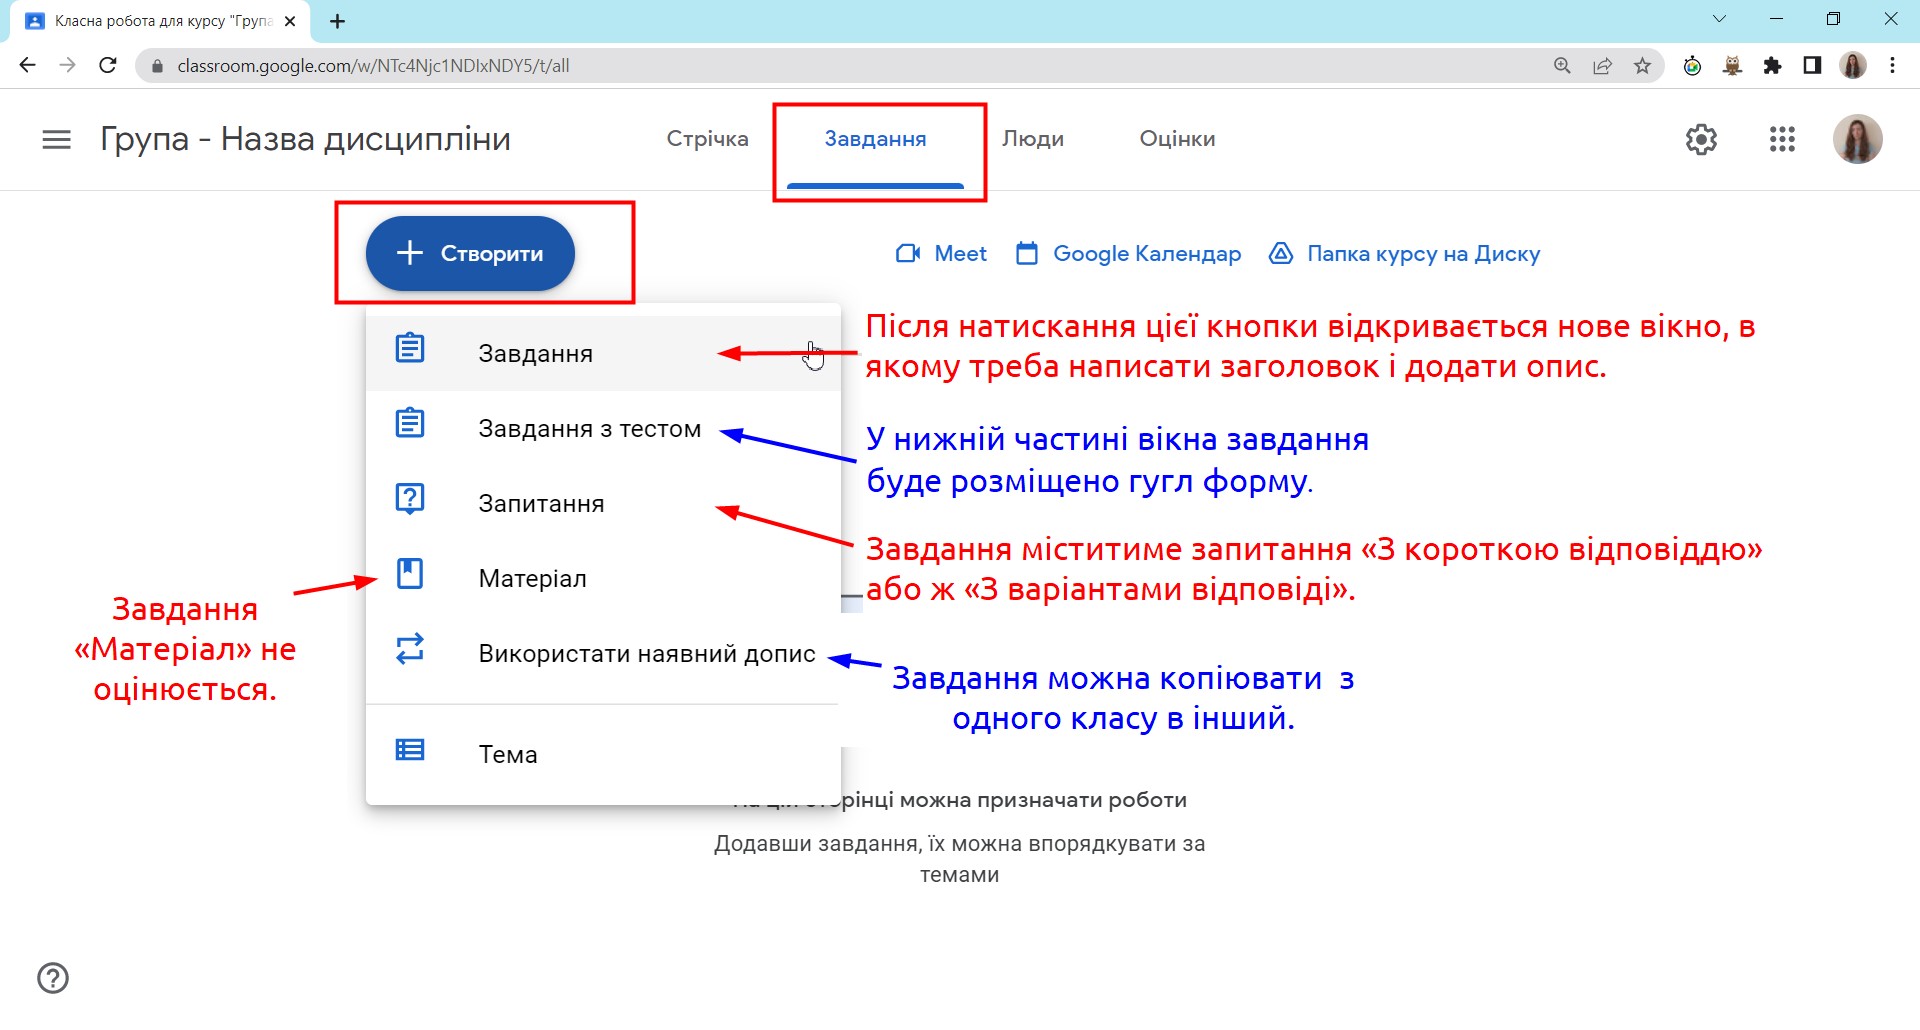
Go to the Classwork tab and click the Create button. Select the assignment type “Assignment”.
-
Enter the title of the assignment and instructions on what exactly the student must do. Add the assignment file (lecture materials, presentations, instructions for completing laboratory and practical work, etc.) or links to external resources with materials.
Remember that PDF files display well on all devices and are convenient to read on both large and small screens.
The title, the instructions and all the materials of the assignment can be edited at any time.
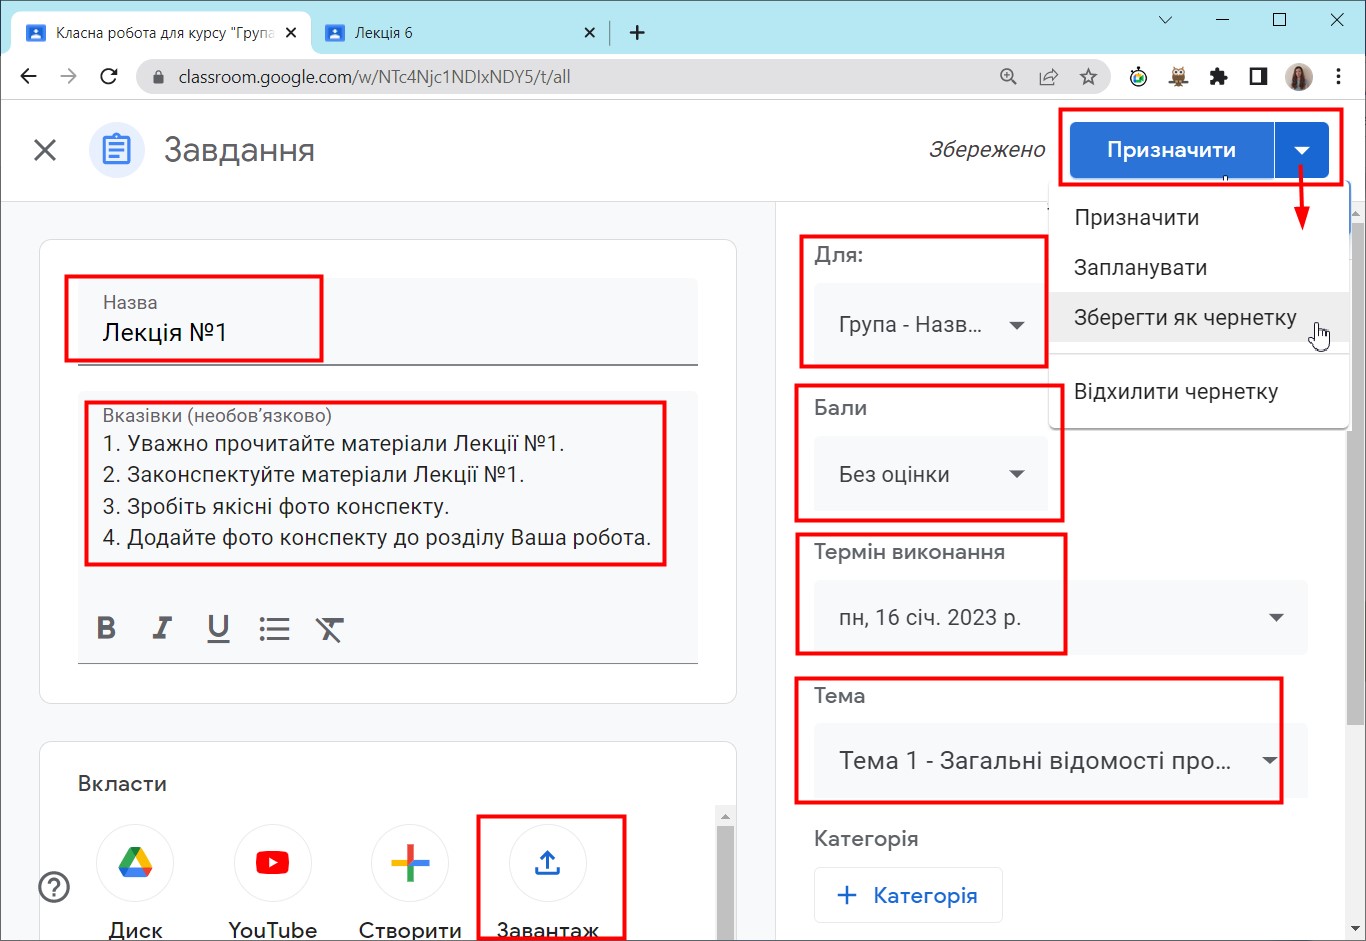
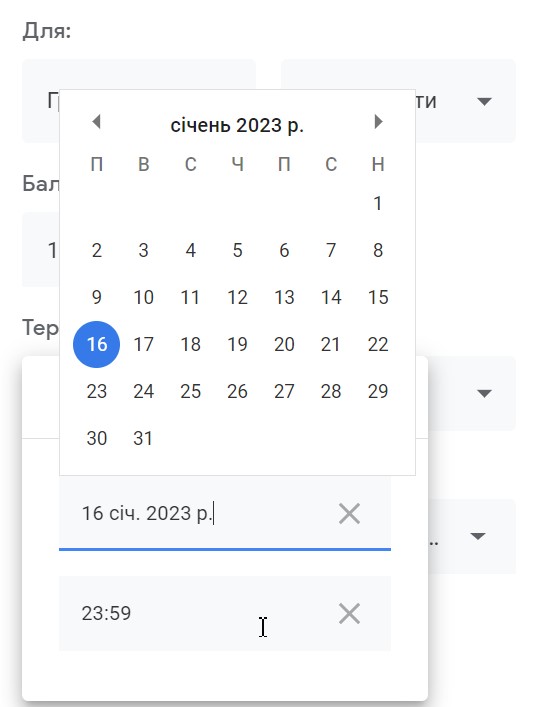
Set the due date of the assignment and the number of points (from 1 to 100, or select the No grade option). The due date of the assignment will be displayed in the calendar and in the stream.
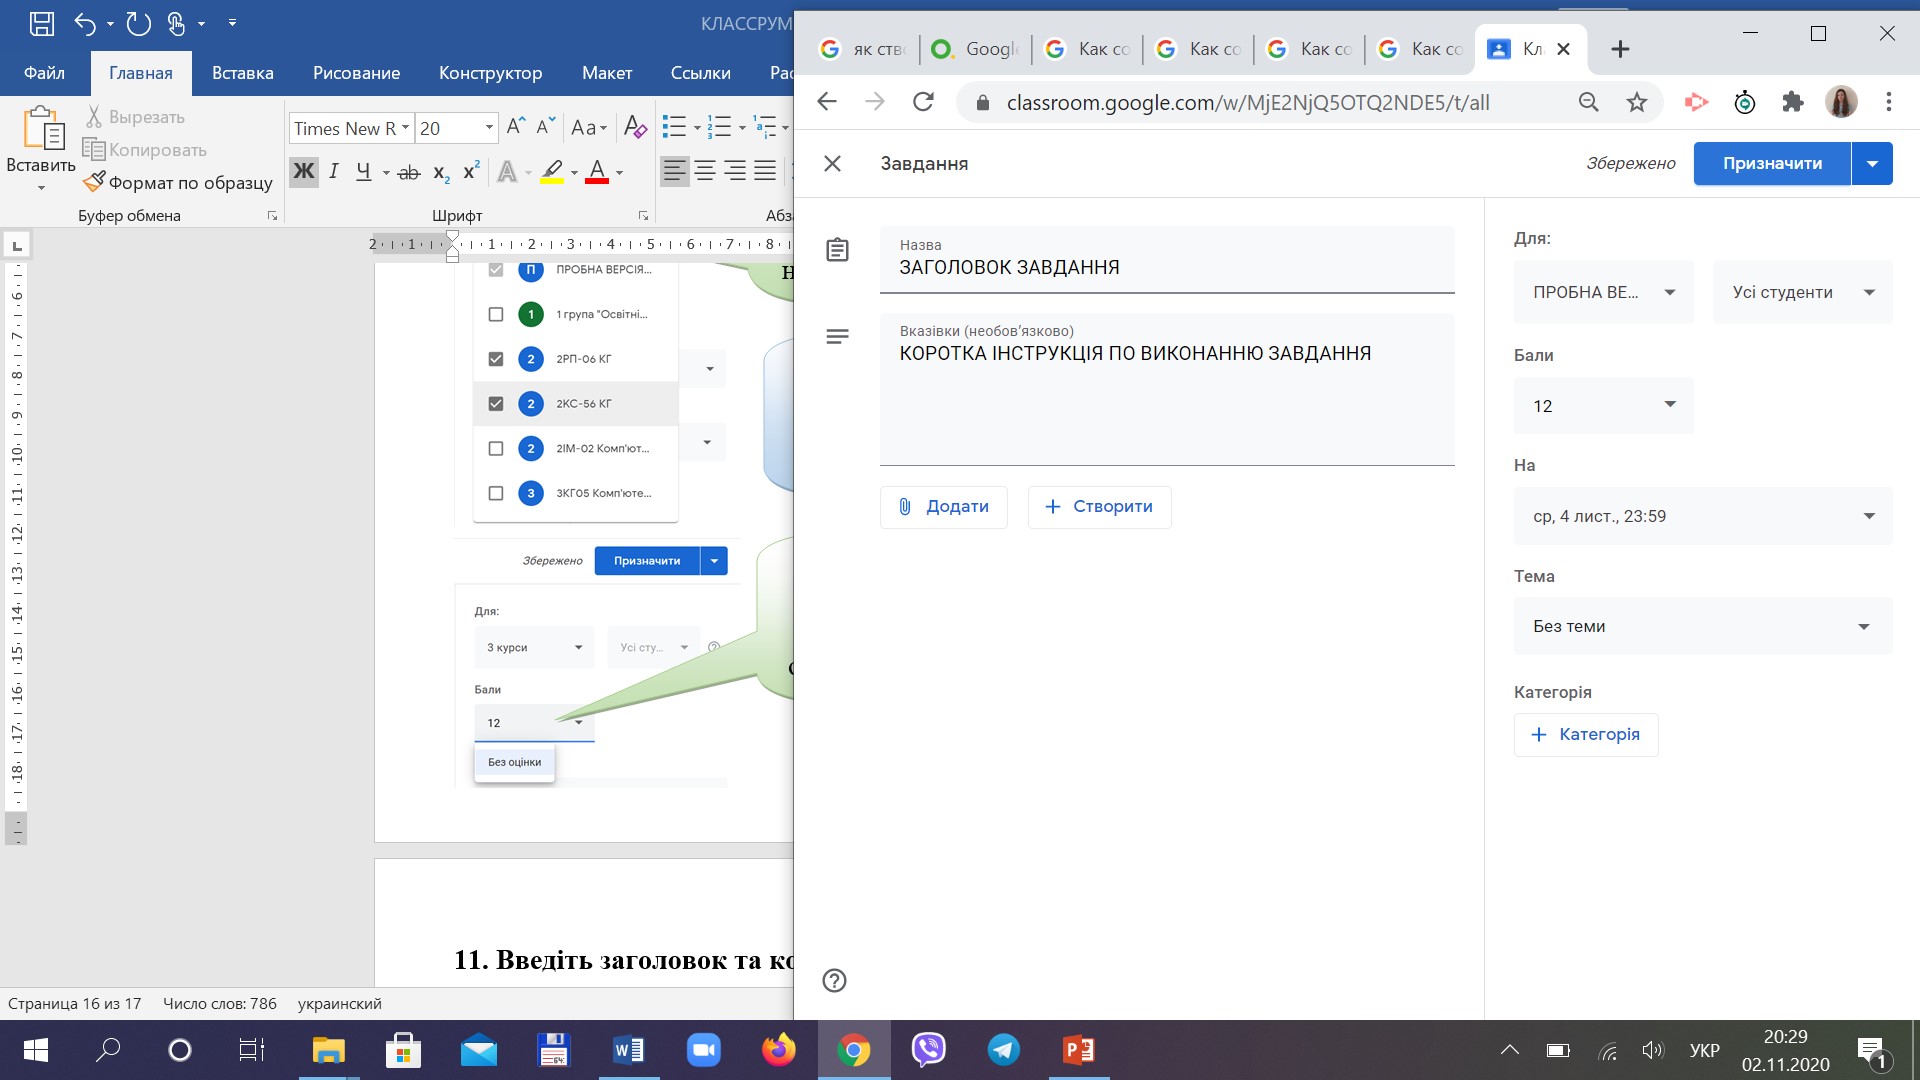
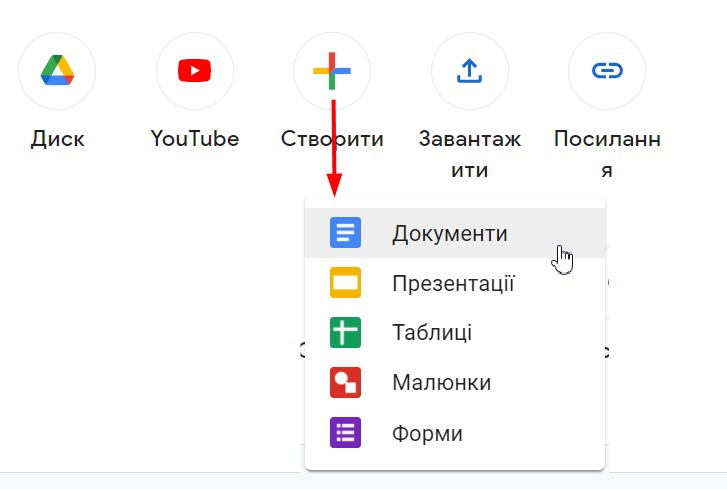
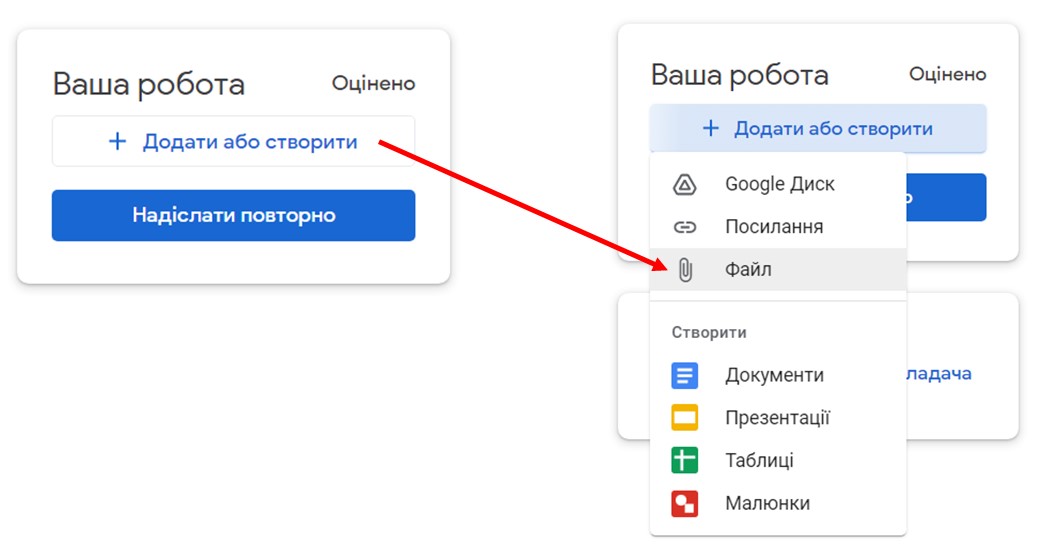
You can create and attach to an assignment: documents (similar to Microsoft Word), presentations (similar to Microsoft PowerPoint), spreadsheets (similar to Microsoft Excel), drawings (excellent for creating images or mathematical formulas), forms (can be used for tests or for collecting information); you can also add files from Google Drive or upload files from your computer, insert website URLs, YouTube links, etc. to the assignment.
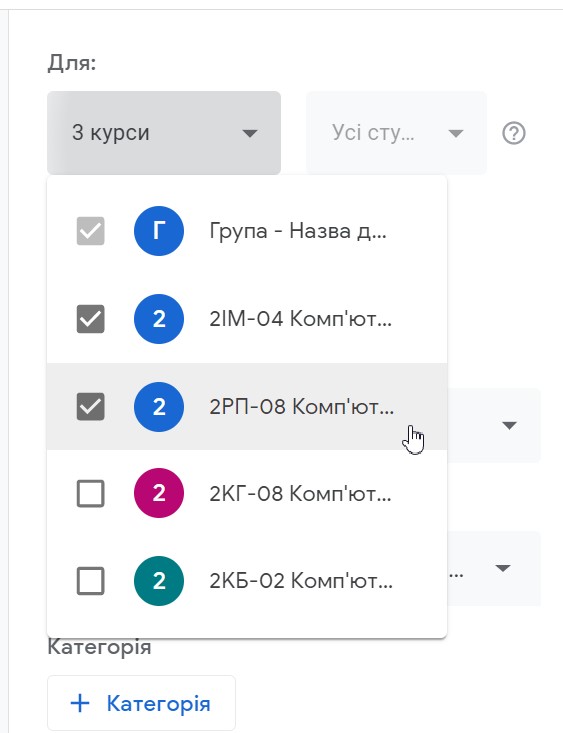
An assignment can be created for several courses at once. If you have several classes, a field for selecting a particular class will appear. Tick the classes to which the assignment is to be added.
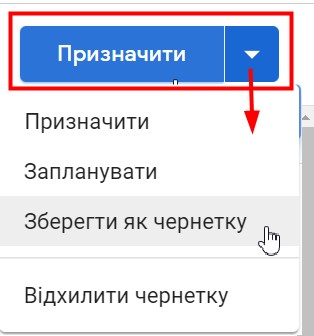
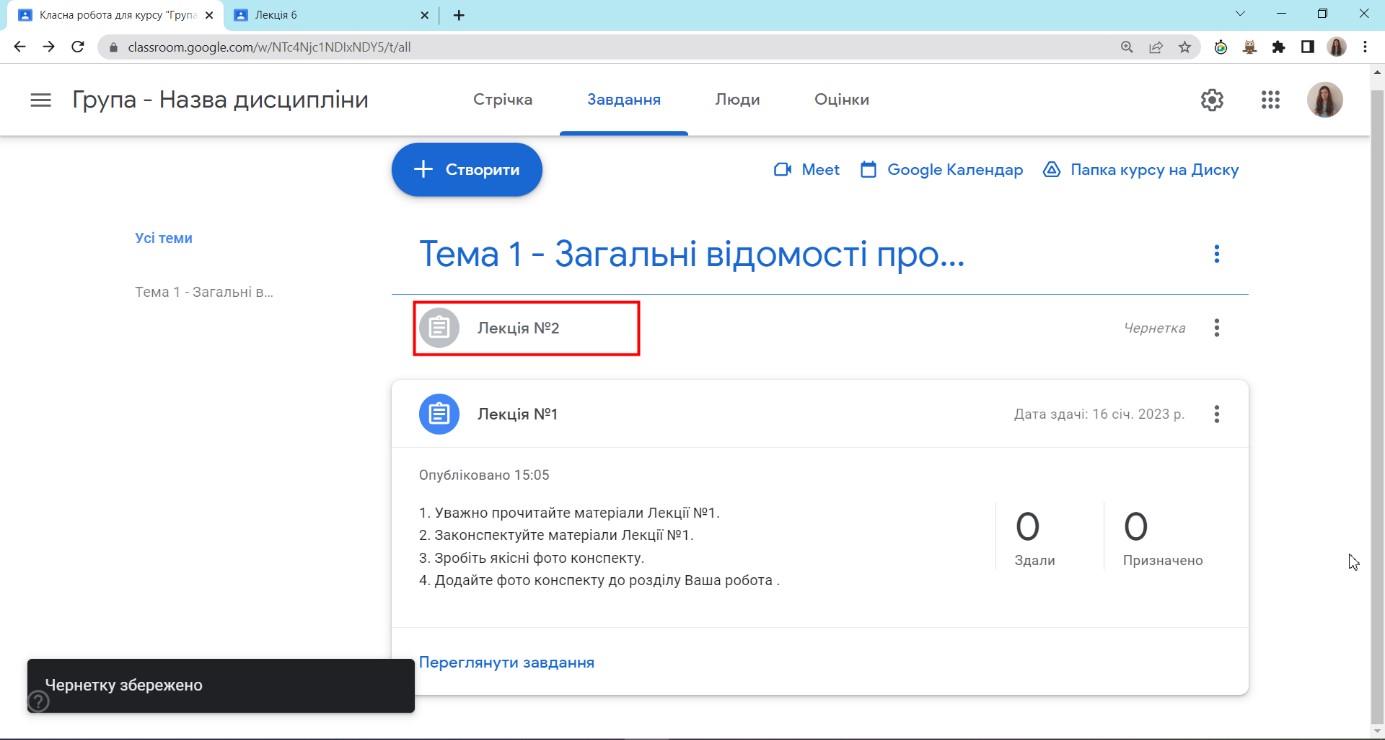
Click the Assign button to publish the assignment in the class immediately (you can also schedule automatic publication of the assignment for a specified day and time, or save the assignment as a draft if it needs further work).
Published (assigned) assignments appear in the students’ classes immediately.
Assignments that have been saved as drafts are displayed on the Classwork tab ONLY for the LECTURER (they are not visible in the students’ classes):
Checking and grading assignments
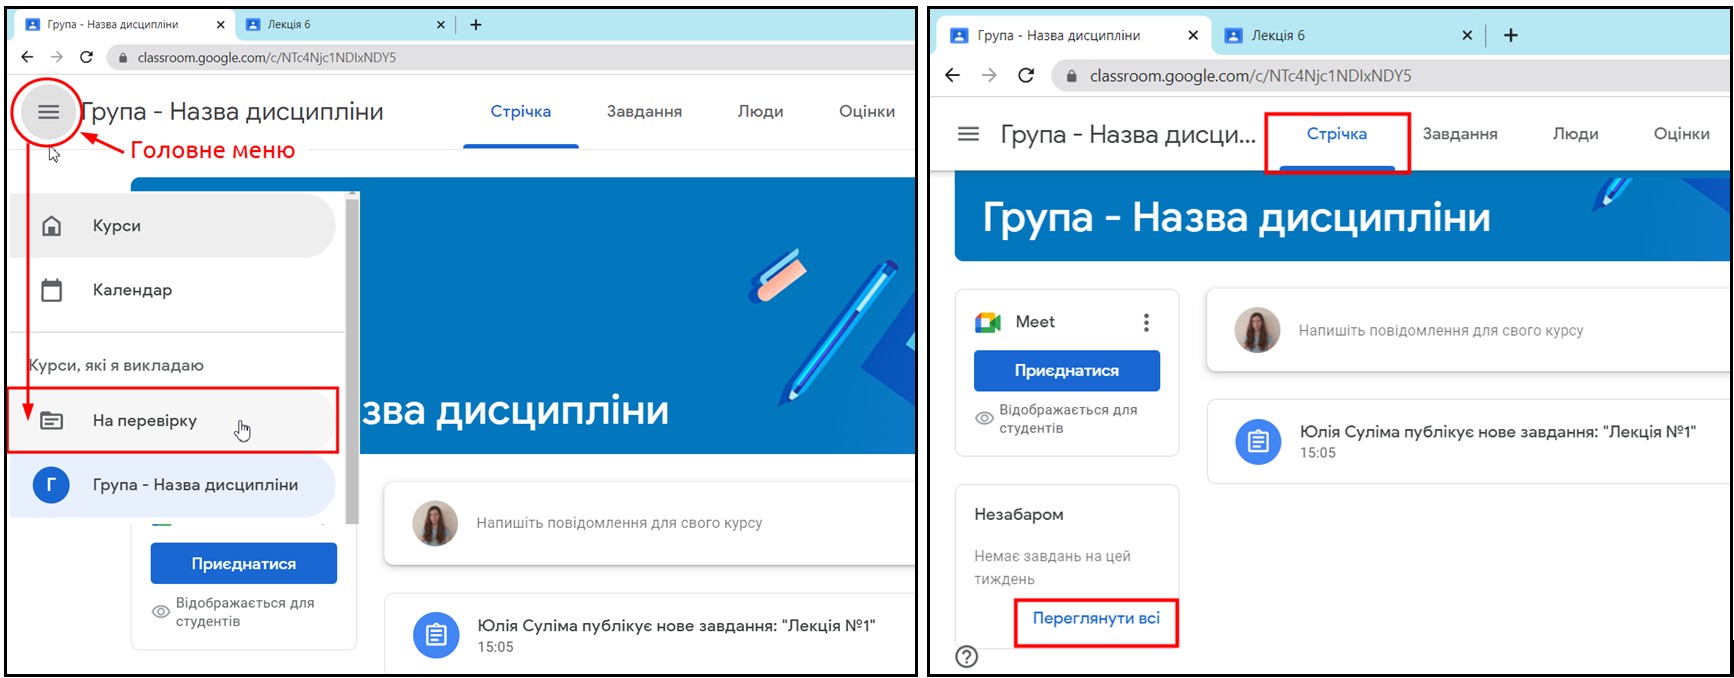
All assignments submitted for checking can be viewed by going to Main menu – To review or from the Stream – View all tab.
A list of all assignments will open with the statuses “Turned in” (shows the number of course students who have submitted their work for checking but have not yet received a grade), “Assigned” (shows the number of course students who have not yet submitted their work for checking) and “Graded” (shows the number of course students whose work has already been graded).
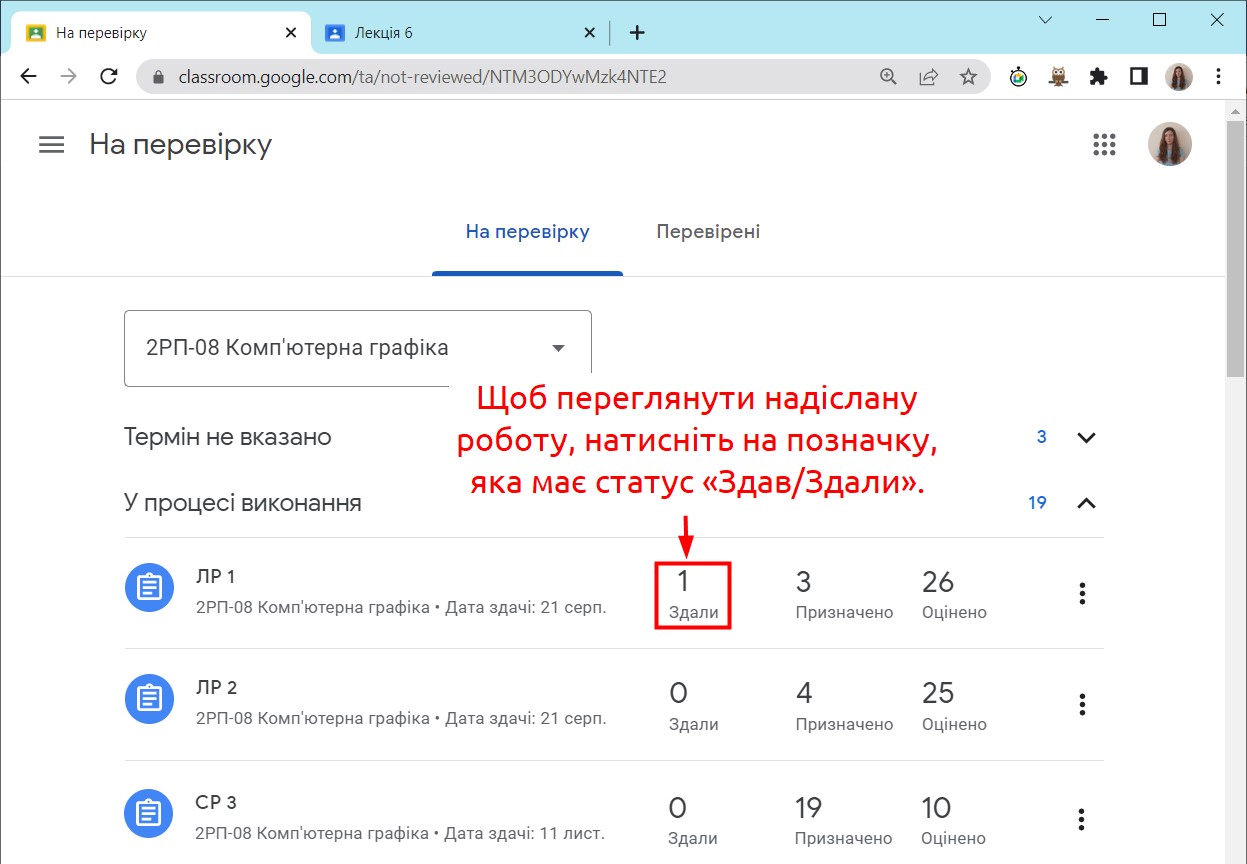
Students can submit text files, spreadsheets with calculations, graphic files, photographs, presentations, archive files, links to external resources and more for checking.
Checking the submitted materials:
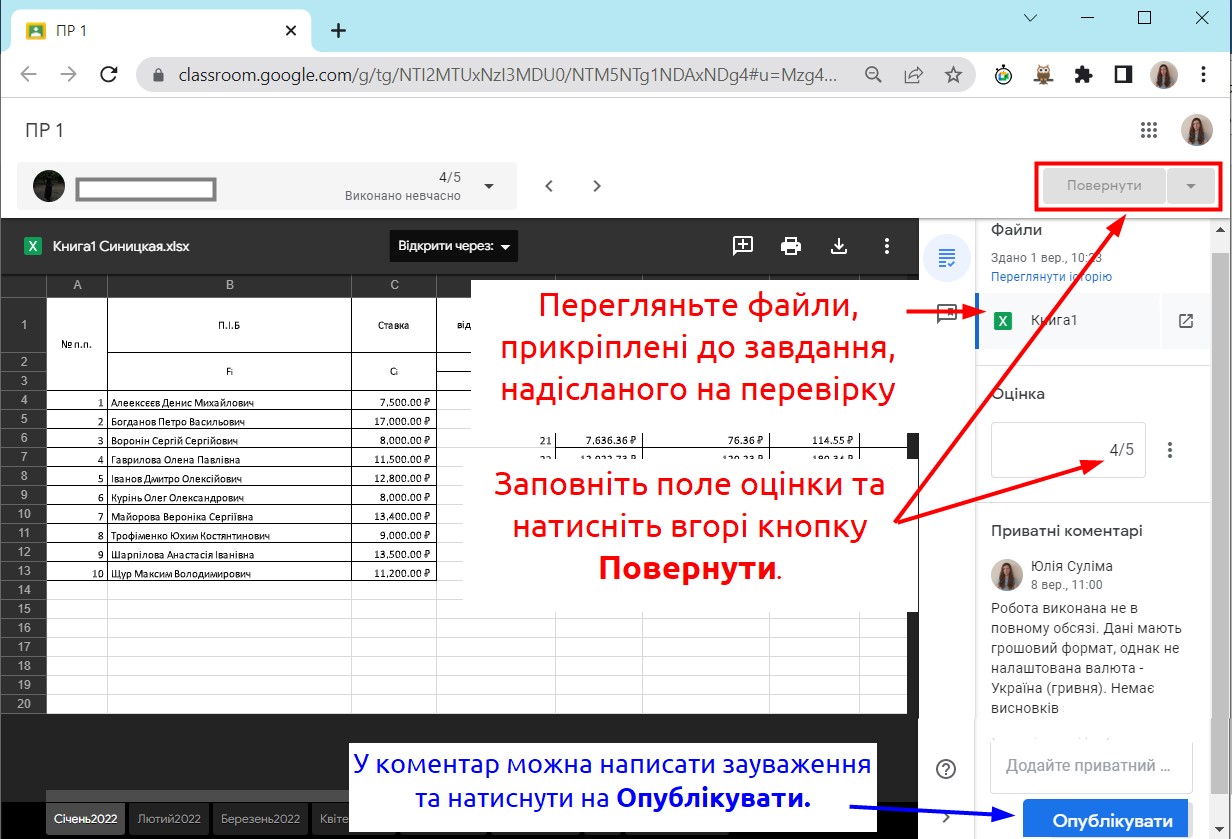
After the lecturer returns the work, the student will receive a notification in the mobile app (if it is installed) and an e-mail stating the grade for the assignment.
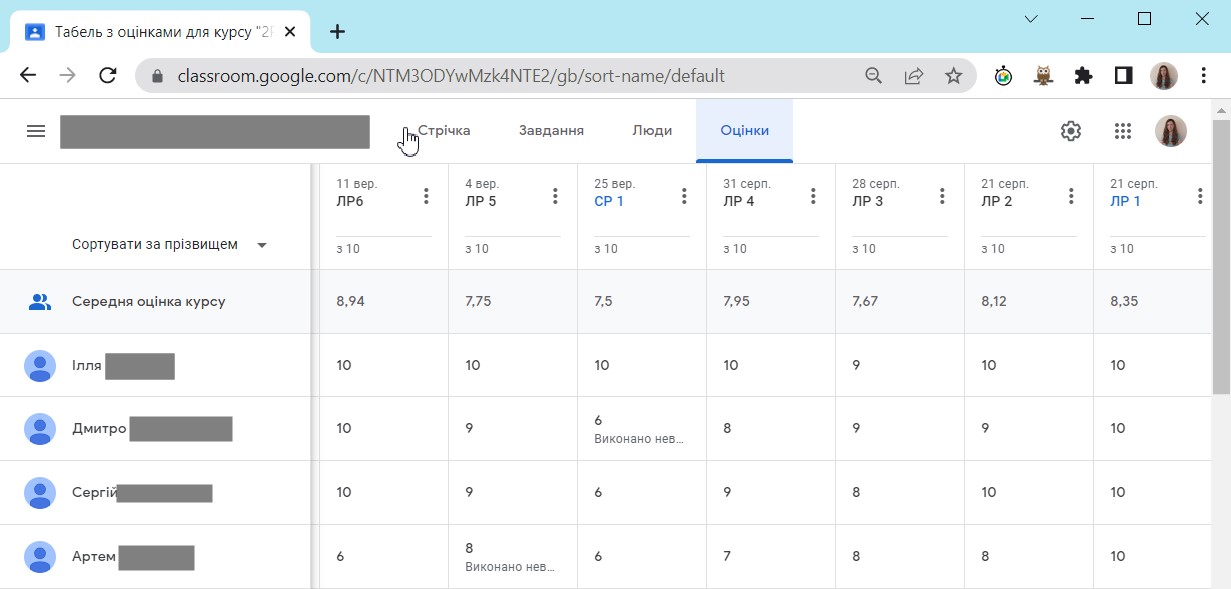
On the “Grades” tab you can view the performance of all students on the course.
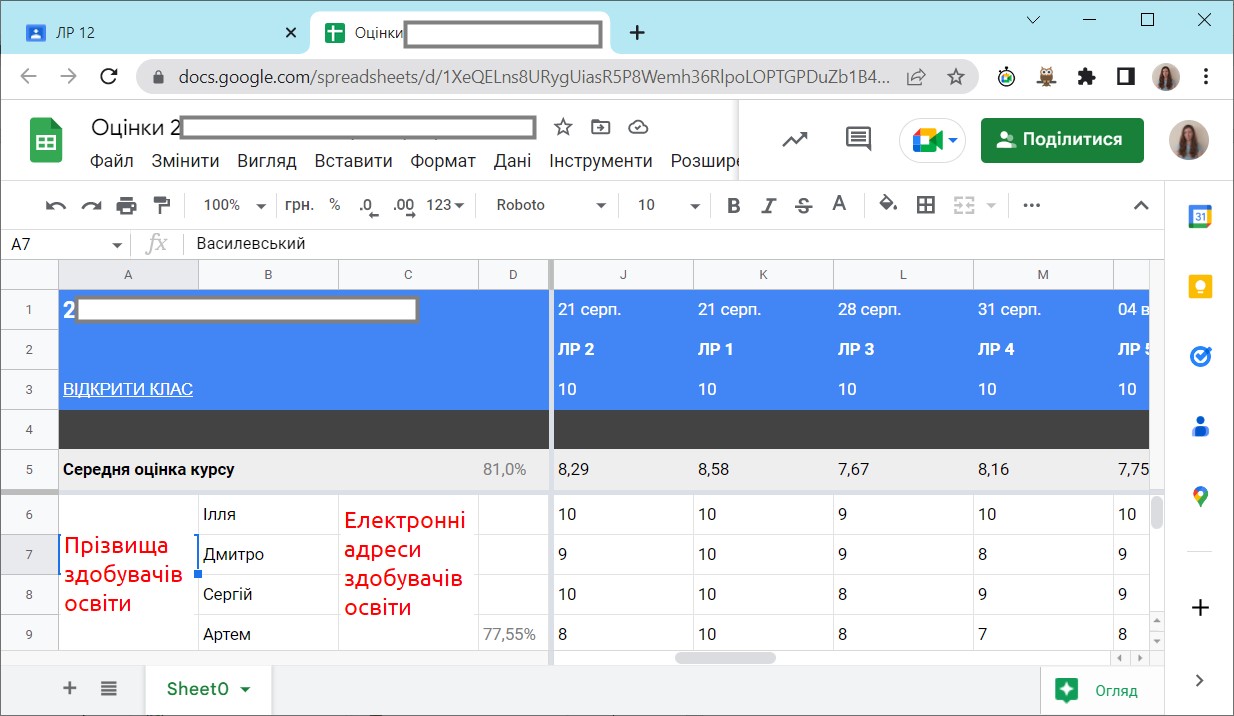
You can export all the grades to Google SHEETS (similar to MS Excel).
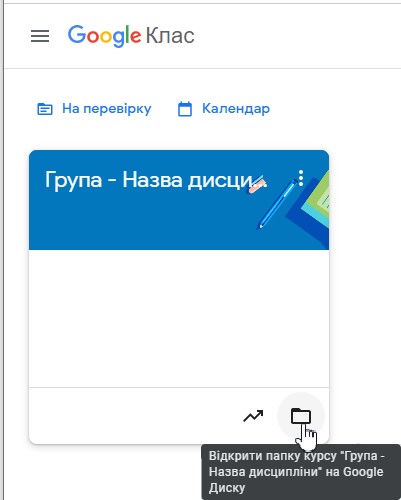
All the course materials are stored in the corresponding folder on Google Drive
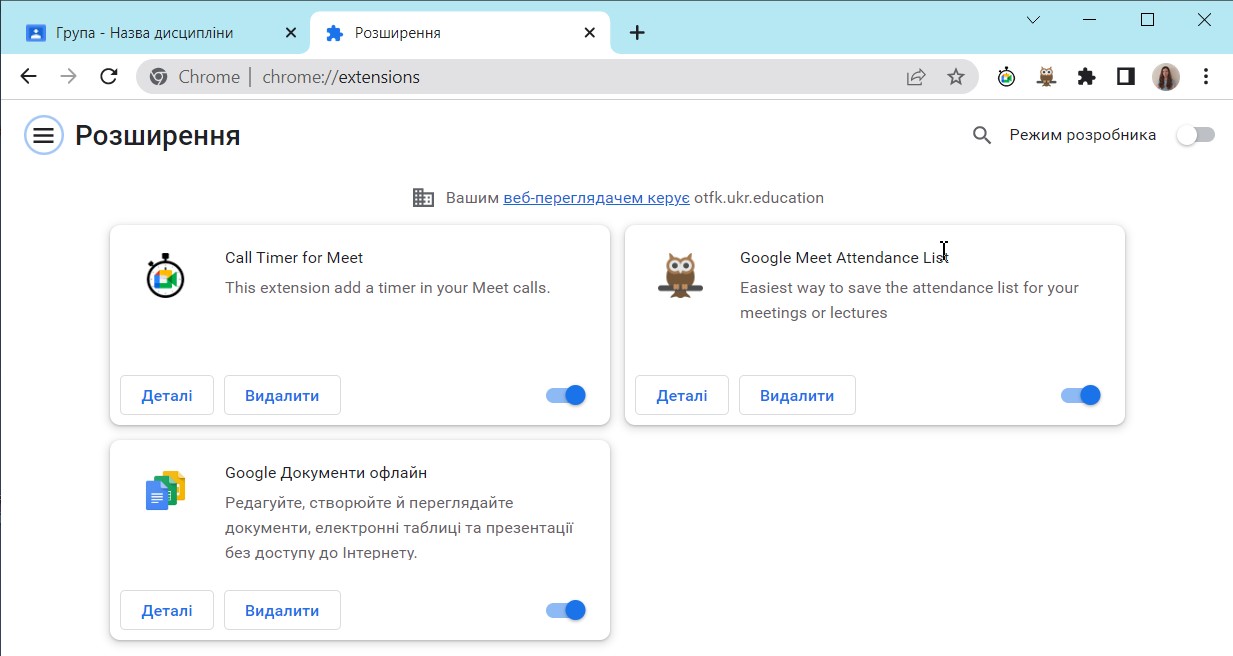
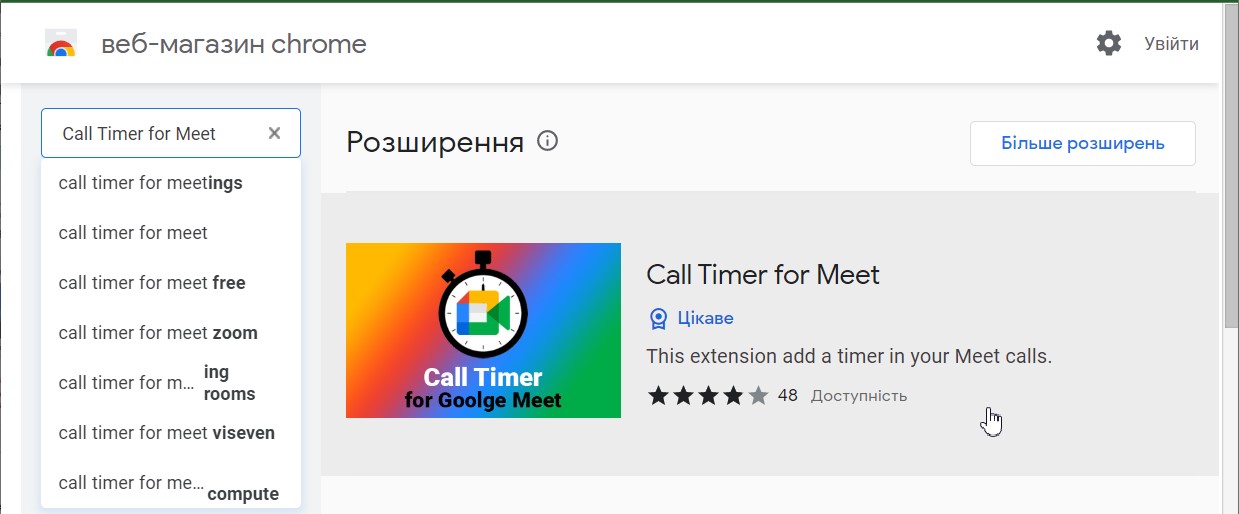
To display the duration of a video meeting and automatically record those present at a video conference, the Chrome browser has special extensions – Call Timer for Meet and Google Meet Attendance List.
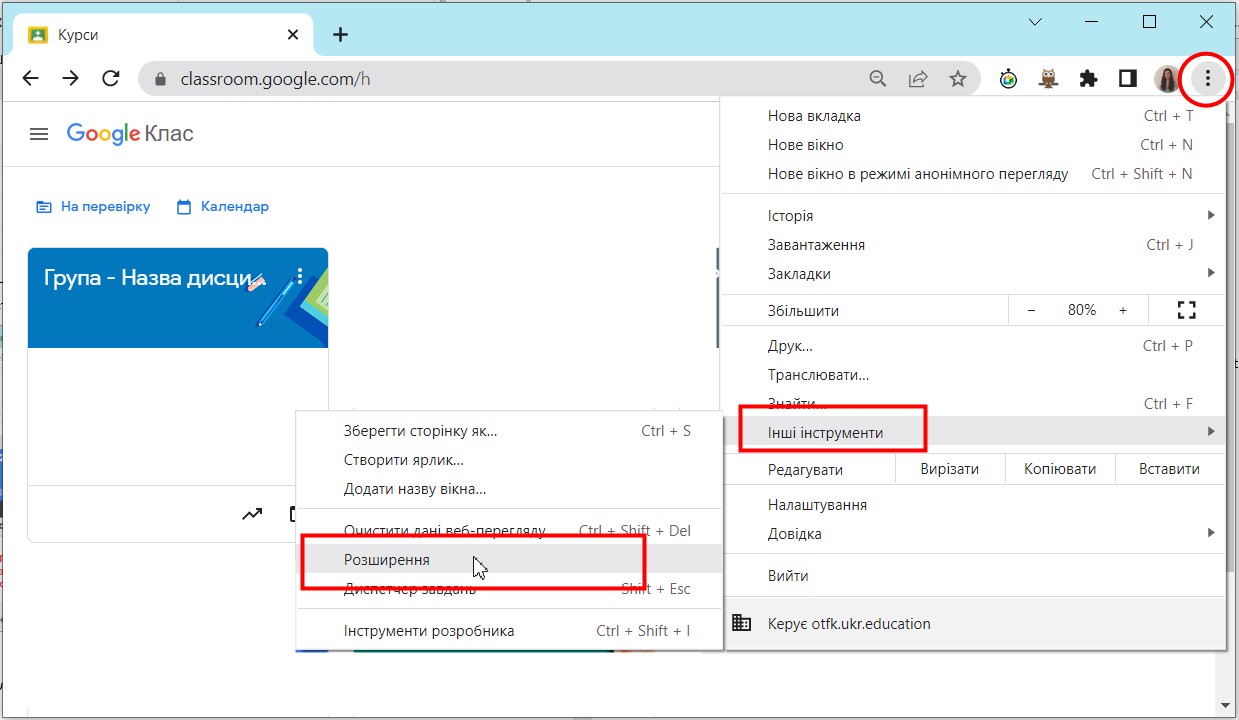
To install them, in the Chrome browser window go to the settings by clicking the three dots in the upper right corner and select More tools – Extensions.
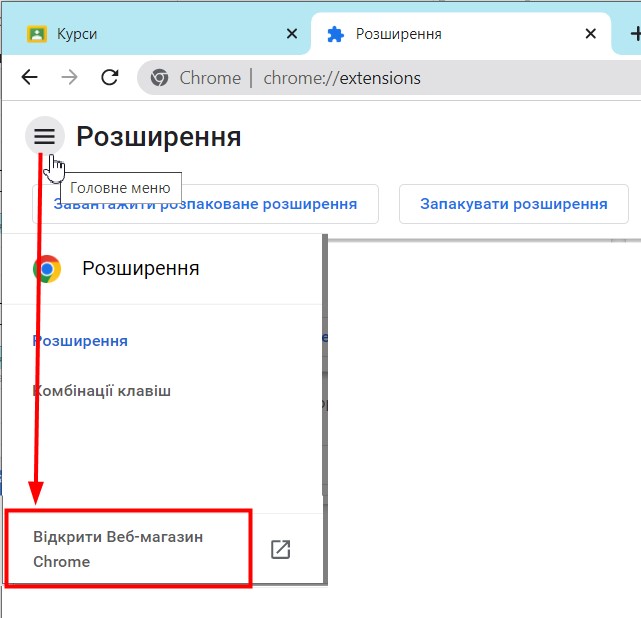
Go to the Chrome Web Store.
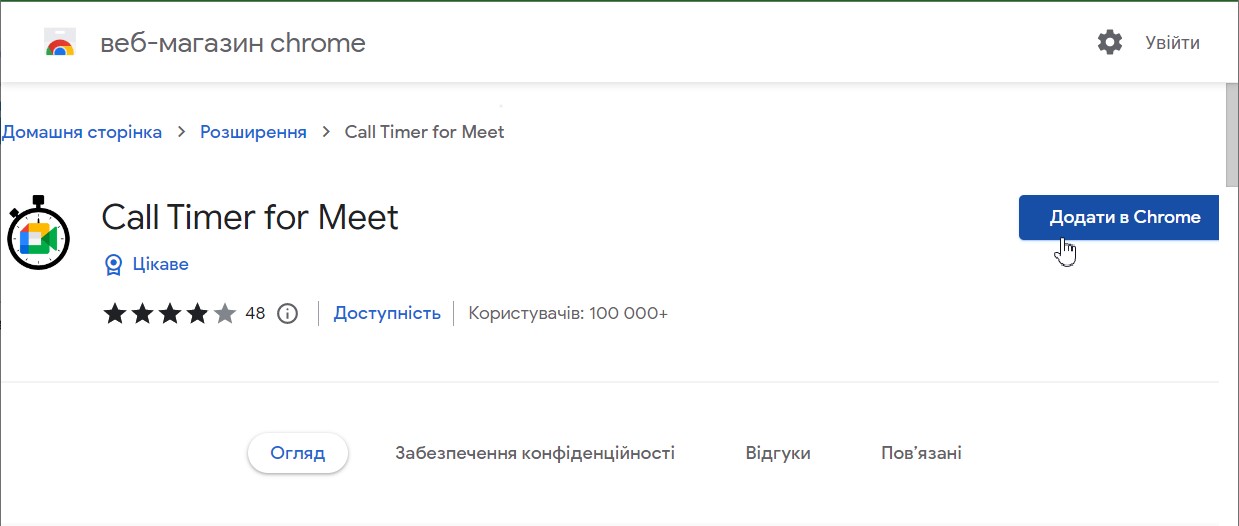
In the search bar, enter the name of the extension, find the one you need among the search results and click the Add to Chrome button.
The Google Meet Attendance List extension lets you save statistics on the video meetings held:
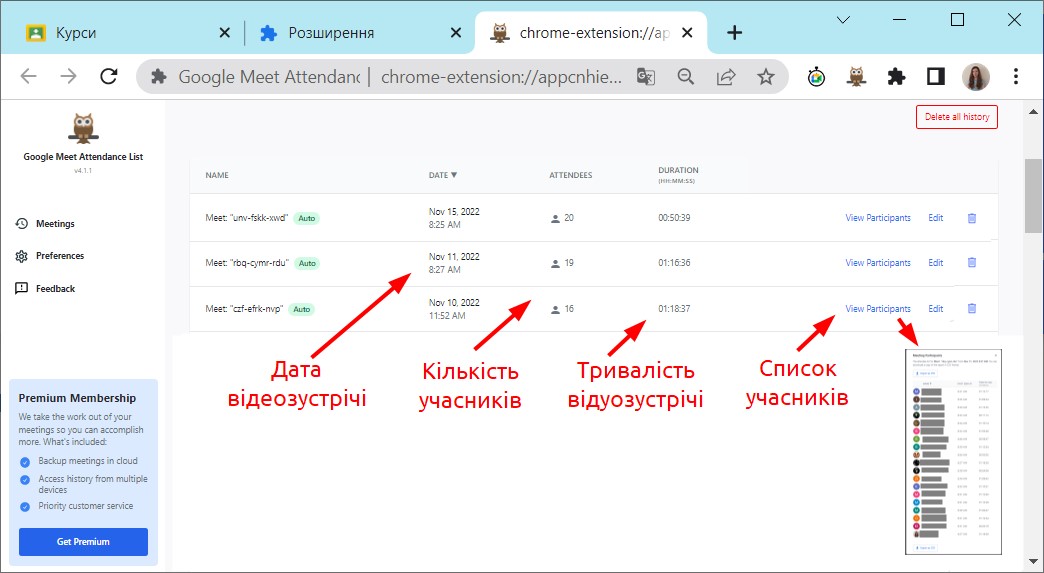
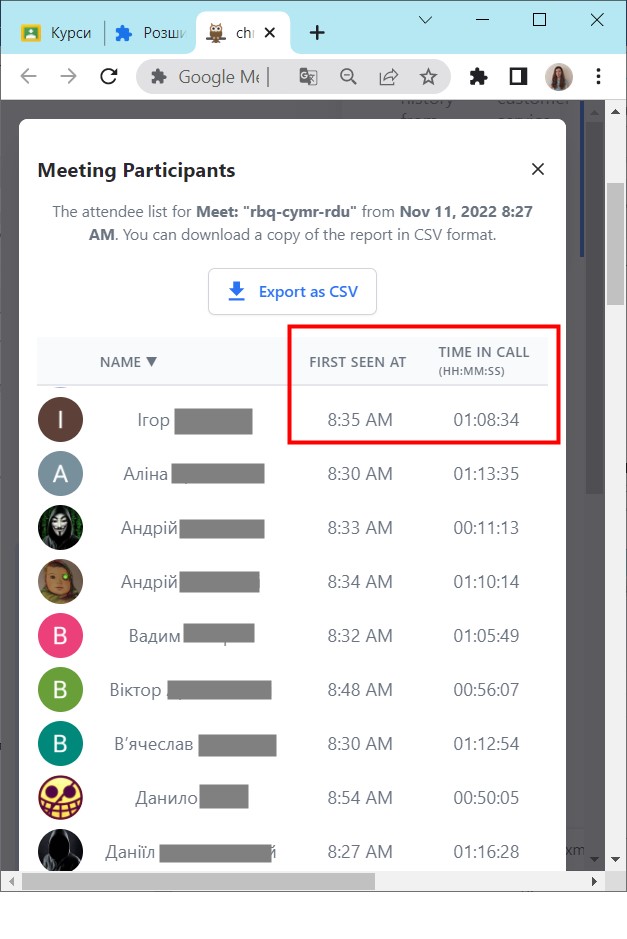
The window displays the date of the conference, the number of participants and the duration, as well as the list of participants, which shows the time when each student joined the conference and how long they were present at it.
Cannot find the information you need?
The admissions office can answer questions about admissions, studying and documents.